One of the options I have chosen is pinched forms - not something I've done very much in the past or had any great success with, but on the first week of the course I had a go at one with everyone else and loved the technique and the finished article so much it seemed like a good idea. Plus it works very well with the nature theme I am going for, being far less strict than something like throwing, less severe than slabbing - just perfect.
So far I have come up with a few ideas - an open flower form, a poppy seed head and a simple bowl with leaf impressions.
This one hasn't worked out quite as I had hoped, but I can work on its flaws to get something I'm happy with producing for the course. It needs to be a little taller to reach the required 8cm, but mostly I want to make it look more graceful and less chunky. I started with the flower part, and formed the stand out of a separate pinch pot - and learned about joining pieces along the way.
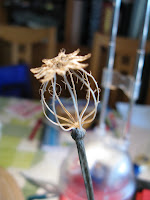

I love poppies and have some in my garden - on the right is a seed head that has weathered beautifully, and all I am left with is the bare bones. My version is enclosed and includes a lid, which was fun to make and tricky to make fit. Again it is a two-piece form, which sort of developed as it went along. At first I was hoping to make the whole thing out of one piece of clay, but I soon realised that it was difficult to keep the neck narrow while opening out the main body, so with the tutor's help came up with a new way of doing it. It was also her idea to add the 'ribs' separately, which I had thought about marking somehow on the main piece of clay, but I was pleased to have an excuse to use my clay gun for the first time to extrude the required shape.

I recently did a few one-day courses on precious metal clay, the last of which was on nature, and had made a pendant with the impression of a leaf, so I decided to try this out with clay. I first gathered together a collection of leaves (it's autumn so I didn't get a terribly good selection) and tried them out on a slab of clay, then picked one of the most successful, a maple or sycamore leaf.

I pinched a straightforward bowl shape, one that I was particularly pleased with actually as I managed to thin out the walls beautifully while it was still quite soft. So that I didn't then distort the bowl when pressing the leaf onto it, I covered a small Pyrex bowl with clingfilm (after discovering that clay sticks to Pyrex rather well!) and put the clay bowl over it, before pressing the leaf all around the top of the bowl. I took the opportunity to smooth out the bowl at the same time, as it was nicely supported - when I then removed it I found the folds in the clingfilm had made a wonderful, gentle texture on the clay, so I did the same sort of thing on the outside - unnaturally produced natural markings, wonderful!
I was tempted to leave the naturally wavy lip of the bowl as it was, particularly since I had removed absolutely no clay from the original ball - then when it had been nagging at me for too long I removed enough clay to make a smooth rim.


 I love poppies and have some in my garden - on the right is a seed head that has weathered beautifully, and all I am left with is the bare bones. My version is enclosed and includes a lid, which was fun to make and tricky to make fit. Again it is a two-piece form, which sort of developed as it went along. At first I was hoping to make the whole thing out of one piece of clay, but I soon realised that it was difficult to keep the neck narrow while opening out the main body, so with the tutor's help came up with a new way of doing it. It was also her idea to add the 'ribs' separately, which I had thought about marking somehow on the main piece of clay, but I was pleased to have an excuse to use my clay gun for the first time to extrude the required shape.
 I recently did a few one-day courses on precious metal clay, the last of which was on nature, and had made a pendant with the impression of a leaf, so I decided to try this out with clay. I first gathered together a collection of leaves (it's autumn so I didn't get a terribly good selection) and tried them out on a slab of clay, then picked one of the most successful, a maple or sycamore leaf.
Where can I purchase a year's supply of patience from? Even a week's worth would do! Absolutely gorgeous work.
ReplyDelete